Showing posts with label Blue. Show all posts

Technic electric beauty pallet review and swatches


posted by Unknown on , , , , , , , , ,

No comments

Hey guys,

I recently picked up this technic eyeshadow palette in a budget beauty shop near me. I had heard of this brand before but I had never bought any of their products. I got this for £1.99. They were also selling another pallet that kind of reminded me of the sunset palette from sleek, but I didn't fancy the colours in that one so only picked up this one.  


The palette is basically the same packaging as all the sleek palettes.


I was really surprised with how pigmented this turned out to be. All of these swatches were done with one swipe of the colour. I am in love with the olive green shade but haven't worn it on my eyes yet. I don't think it will go with my blue hair :P. I can't believe the colours are so good for something that was £1.99 it works out at about 17p per eyeshadow! If you see this product I would definitely recommend picking it up.   

Sleek iDivine the original pallet review and swatches


posted by Unknown on , , , , , , , , , , , ,

No comments

Hey guys,

I've been on a real pallet buying frenzy at the moment and have got a lot more to show you coming soon. I really like sleek makeup and have owned the acid pallet for years. I also used to use their liquid eyeliner (which is my fav liquid liner) until I switched to using there gel liner when the liquid ran out. I've been wanting to get all the pallets for a while but decided to wait until superdrug was doing a 3 for 2 as it would save me a bit of money as sleek have gone up in price since I first bought the acid pallet.

Today I wanted to show you the original pallet as it is really good quality, super pigmented and cheap in comparison to buying single eyeshadows as you get twelve different shades for £7.99 which works out £0.66 ish per shadow. I also wanted to show you this one to start with as I've got 7 more sleek pallets to show you and felt I should start with the original :P

On with the swatches. (sorry about the quality I had to take these on my phone)

All the colours are super pigmented. Most are shimmer/ metallic apart from the black which is black which suits me fine as I'm not a massive fan of matte shades. This is without flash 


Same as above but with flash. Some colours took more than one swipe to build up the colour such as the darkest blue and the purple but other than that most are the result of one swipe. 
The pallet without flash. I love all the shades but my favourite are the two in the bottom right corner the gold and the olive green. All these colours are amazing for this season and could create really great daytime and party looks alike. 

The pallet with flash. All colours come out true to how they look in the pallet and are such good value for money. I really recommend this pallet and the older sleek pallets as some of the latest releases such as the vintage romance pallet are not as well pigmented. Also the black shades are a lot more true black in the older releases as they are more charcoal in the newer pallets. 

The closed front of this pallet with the sleek logo

The back of the packaging is good as it says the name of the pallet so you don't have to open all the pallets to find the one you were initially looking for.

Hope you enjoyed 
Please comment and follow me on bloglovin :P
Lauren

Dyeing My Hair Turquoise


posted by Unknown on , , , , , , ,

No comments

Hey Guys,

Just before going to uni I decided that I was going to go from dark brunette hair to bright turquoise
blue/ green.  That was about 5 weeks ago and I had to re-dye my hair last weekend as the dye is semi permanent so does fade.

To take my hair from brunette to turquoise I first had to bleach it. I used Live Color XXL Colour Intense Blonde Absolute Platinum twice to take my hair to light blonde.


 After I had bleached it twice I tried to tone it to get out the brassy tones with touch of silver but I dont think this worked and so my hair was a bit greener in patches.


The first time I dyed it. With Directions Turquoise 


My hair today, I'm wearing my new wolverine tee. 

Hope you enjoy, leave some comments if any of you have crazy coloured hair like me :P

Lauren 

Makeup history/ Lipstick collection.


posted by Unknown on , , , , , , , , , , , , , , ,

No comments

Hey again,

Recently I have really got into wearing lipstick and makeup in general. I have in the past been really terrible at applying makeup and went through awkward stages of eye makeup. I was quite into rock and so went through the whole two much eyeliner during my teens. Also I used to love this dark purple and lilac combo that would have been alright if I hadn't been about twelve and knew how to blend. Up until this year I would only maybe use a bit of powder during the day and use eyeshadow and lipstick when going out at night. I still most of the time forget to use mascara as I find applying it annoying and always manage to get some in my hair/ fringe. But I think I am somewhat better at it now. As they say practice makes perfect.

I have always found it really hard to find a foundation to suit my skin. The first foundation I bought was the Maybelline dream matte mouse which was god awful. I was quit young so probably bought the wrong shade as I tested it on my hand and not my face. Yet if I bothered to use it, I would always take it of as it made me orange, and as a goth kid that was not the desired look :P. I recently have been using the Maybelline  dream fresh bb as it is light and provides the right amount of cover my skin needs. I had also been using the fit me foundation also by Maybelline but I'm not sure if I like it anymore (I have the powder an concealer as well and these are both good).

I'm not a big fan of blush and currently don't own any but if I fancy wearing some I mix lipstick with my bb cream to create a liquid blush. I much prefer bronzer and use it to contour my face, I currently use the Rimmel sun shimmer light matte bronzer.

I am really into lipstick at the moment and splurged a couple weeks ago on a MAC lipstick (media, its a satin finish) which I love. This is a very sultry, sexy colour and is my perfect red lip.

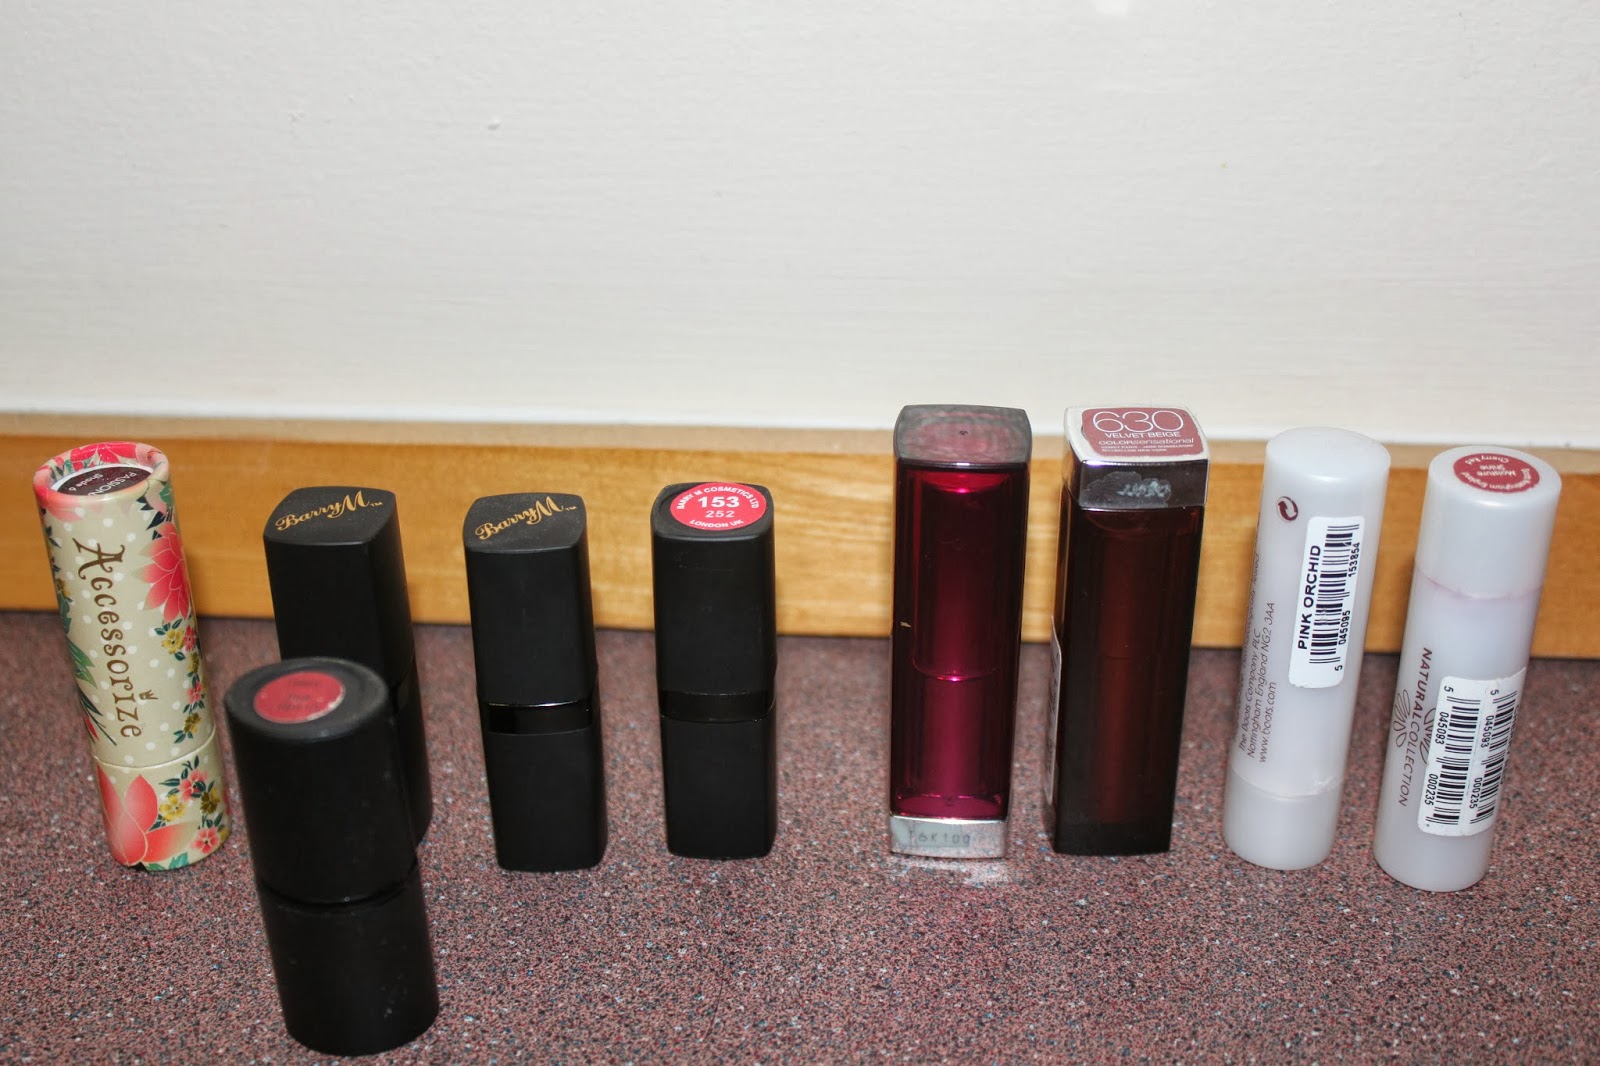
Above are all the lipsticks I own apart from Media as It was in my bag. I have a few from Maybelline, pink pearl and velvet beige. Some from the natural collection (from boots), these are really cheap and are amazing quality, I have pink orchid and cherry red. I have a blue, black and pink from barry M and one from sleek that they don't do anymore claret and an accessorize purple, passionate.  


I haven't mentioned eyeshadow and with the amount I have It will probably have to be in a separate post. Also the shadow I use at the moment is from an ancient set that I found while packing for uni that was bought from argos years ago and so wont be of much use to anyone to see it.  

Hope you enjoyed this post, please comment and follow :P
Lauren 

DIY Comic book shoes


posted by Unknown on , , , , , , , , , , ,

No comments

Hey guys, I haven't posted in a while as I haven't been bothered to edit my photos again, sorry. I've also decided to branch out the blog and post about the DIY projects I've been doing recently. I've seen a lot of comic book shoes people have made lately on instagram and pintrest and also on tickld and so really wanted to make my own. It is a super easy way to jazz up a pair of shoes and you don't have to use comics you could use any magazine. I do like marvel comics however and decided to make some spiderman shoes. I'll post pics first then explain how to create them although there are some great youtube tutorials if you are going to make these.


To create these I bought some plain black patent high heels from Barratts for £8 in a sale. I also bought the amazing spiderman 475 (34) from ebay. I then cut the comic book up and used PVA glue to stick create the shoes. (The youtube video's suggested to use modge podge but I had a thick pva glue which is sort of the same thing.) I love these shoes and they came out so much better than I imagined.

Hope you enjoy please comment and subscribe If you want to see more DIY posts

Lauren :P

Mint glitter


posted by Unknown on , , , , , , , , ,

No comments

Hey guys,

Back with another glitter experiment today using yet more of my recent purchases. I used a  base of NYC blue sky a minty bue green colour I've bought since my haul post. This is an amazing colour and I am loving NYC as they are even cheaper than Barry M and are a really good quality. Some are even one coaters such as full metal jacket. I painted a coat of Barry M rose quartz over the top. I love this glitter as it has larger circle glitter and finer glitter. Pictures below.


Hope you enjoy 

Please comment and follow. 

Im on most social networks :P

Aqua glitter swatch


posted by Unknown on , , , , ,

No comments

Hey guys,

This is one of the glitter experiments I mentioned previously. This looked a lot nicer in real life as I am only just getting into glitter polishes I am learning how best to photograph them. I swatched Barry M aqua glitter over Barry M gelly Blue Grape. I loved the contrast between the two colours and could not stop looking at my nails. So sparkly and pretty.


Hope you guys enjoy and I am still catching up with posting so still loads to come.
Lauren

Todays Nail Polish Haul


posted by Unknown on , , , , , , , , , , , , , , ,

No comments

Hey guys,
Ive never done a haul post before but I have mentioned in posts when I'd bought new polishes. Today I went a bit 3for2 crazy in superdrug as they are having a 3for2 on all nail varnishes. I picked up 12 new polishes for under £20. Bargin, I also try to maximise the money I save buy buying all the polish that cost the same amount together, this involves queuing up a couple times but you save more money as the cheapest product is always free.


To start I bought these NYC Foil explosion polishes at £1.99. The green is Magic Earth, the blue/silver is Aqua Mist, and the pink is Power of Elements. They had another pink and a bronzey peach but I didn't think these would suit my skin tone. I wanted these polishes as I have heard good reviews about them and thought they would be good for stamping which I want to get when I get paid lol. 


I bought these other NYC colours for £1.79 and got, Manhattan the plumy damson colour, Full Metal Jacket the gold, and East Village the glittery blue. 


I also bought these Barry M glitters as they are some of the only Barry M's that I don't own and as I dont have many glitters I wanted to have some. As you know I love Barry M and so can't pass up getting them on a 3for2 deal.

Hope you guys enjoy and also take advantage of the 3for2 I havent tried any of these yet but will keep you posted.

Lauren.


Fourth of July American Flag Nails


posted by Unknown on , , , , , , , , ,

No comments

Hey guys,
Just a quick holiday themed post today, I know the holidays nearly over but I've only just done these. Pictures than a quick how to!


To do these I started with a white base coat and then using a toothpick I painted a blue, Barry M indigo, square at the top left of all my nails. I than used the toothpick to draw red lines down the nail and then added white dots over the blue when dry. Finish with top coat and your done :P

Hope you enjoy,

Lauren 

Please follow and leave some comments. 

Peach and blue polka dots


posted by Unknown on , , , , ,

No comments

Hey guys,
I've got a couple of posts for you today as I'm getting round to posting my latest nails.
The first is this peach and blue polka dot. I've been trying to use some of the polishes that I have but haven't worn yet, peach being one of them. Peach really isn't my colour and so I added the blue to break up the colour and create a cute design. Dots are so easy to do with a dotting tool and so Is one of my favourite things to do on my nails.


I created large dots in a zigzag down the middle of my nail and then added smaller dots in a line either side. This isn't my favourite design but I took it of soon after the pictures as I hated the way peach looked with my skin.

Hope you enjoy,
Lauren